Saturday, September 1, 2012

Published in Somerset Digital Studio and Creating Keepsakes Magazine

I'm very excited to have been published in two of my favorite scrapbooking magazines this month, alongside a few of my creative friends on the Anna Aspnes Team , Donna Goar, Adryane Driscoll, Heather Prins and Anna Aspnes: Somerset Digital Studio Autumn Edition 2012 and Creating Keepsakes' Better Digital Photos and Scrapbooking. Somerset Digital is on the shelves now and CK Better Digital Photos will be out this Tuesday, September 4. 


Monday, August 13, 2012

Photo App Tutorial Combining AutoPainter, Tiny Planet and FilterMania2


‘Moonly’ How-to Tutorial using Photo Apps
In the past I have usually used PSE filters to blend and process photos. But when I’m on the go, my iPad has become a valuable tool for photo processing. I am also finding that I can use the same images I post to Instagram on my digital scrapbook pages in my Gallery at Oscraps.

For this process, you will need the following three apps: 1. AutoPainter (for iPhone) or AutoPainter HD (for iPad), 2. Tiny Planet and 3. FilterMania 2

Using these three apps, this tutorial will show you how to go from this: 


to this:


Here's how you get there:
1. Open AutoPainter (iPhone) or AutoPainter HD (iPad) and load your original photo. There are four ‘masters’ from which to choose. I chose the first option ‘aquarell’. Click the green start arrow. The app will go through a series of three steps. You can stop the process at any time during these steps and save the result to your camera/photo files. The following three images show the completion of steps 1, 2 and 3. Each step gives you slightly different results, showing the most detail in the final step 3. 

AutoPainter Step 1


AutoPainter Step 2


AutoPainter Step3


I chose Step 3 and saved the final image to my camera roll (always remember to save your results!).

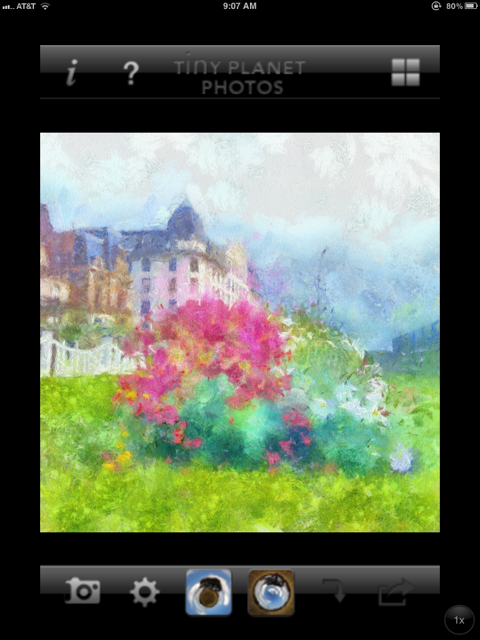
2. Open Tiny Planet and load the image you saved from AutoPainter.


Click on the large round icon and you will get this fun result.


Save the image to your camera roll...and now on to the final step!
Open FilterMania 2 and load the image you saved from Tiny Planet.


Click the green arrow to proceed with the app process. You will see a series of filter options at the bottom of the screen.


Select the 'Moonly' filter and voila...you've got the final result!


Click 'Done' and save the completed image to your camera roll.


To access this image for PS or PSE you can either email it to yourself and save it to your photo files or access it from your photo stream in the Cloud if you have that option.

I used the final image on the page below which you can see (here) in my Gallery at Oscraps, along with a list of products used. I blended the image with Anna Aspnes' SprayPaint FotoBlendz No.1 clipping mask. 


Tuesday, July 31, 2012

Scrapbooking Travel to Cities

Puerto Vallarta
I created this page for an article at Get It Scrapped, 12 Ideas for Scrapbooking Travel to Cities. My page is based on a trip to Puerto Vallarta. I used a template from Anna Aspnes Designs (Artsy Layered Template No.50 and masks from Artsy Layered Template No.15) to blend the photo into the background. I used the glows to add to the sunny beachy atmosphere of Puerto Vallarta. Links to the supplies I used can be seen here.


Sunday, July 8, 2012

Using Digital Photo Masks on Scrapbook Pages

Debbie Hodge at Get It Scrapped says "In hands-on artistic works, a mask is a protective shield that keeps an area from being affected by an applied medium. For digital creations, that “shield” can end up being the very shape to which a medium is applied. What’s more that medium can be your photo."

Here are some pages I created using photo masks

1. Using textured brushes as photo masks


Sunrise at Alderbrook
Any digital element can become a clipping mask for a photo, with an exciting variety of results. On this page I clipped my photo to an opaque brush (Anna Aspnes’ ArtPlay Palette Great Outdoors_Brush 7) that resembled ridged cardboard, causing the ridges of the brush to appear in the photo. I adjusted the shape of the brush to better fit the photo. I also added two layers of Anna’s Great Outdoors_Brush 6 under the clipping mask to add more depth to the photo. Then I used FotoGlows to add light and color to create a sunrise scene.


For more information on the technique used to create Sunrise at Alderbrook check out this: Tutorial: Using Textured Brushes as Masks

2. Extending a digitally masked photo outside the borders of a frame


Wine Valley
Extending a digitally masked photo outside the borders of a frame can result in added depth, a softening of borders, and an artsy feel. 

Supplies by Anna Aspnes Designs:
(Font: CK Romance)

Read more about using digital photo masks in this Get It Scrapped article 


Thursday, July 5, 2012

Blending Photos into the Sky


Fly me to the moon This is a photo of my mother from the early 1930s. I wanted to create the dreamy illusion that she was riding her wooden horse up to the moon. With a transfer from Anna Aspnes' ArtPlay Palette Wander and a clipping mask from Anna's Original FotoBlendz No.5 it was easy to achieve this effect.

I started with a background paper from ArtPlay Palette Blossom and two cloud image transfer layers from ArtPlay Palette Wander.

Background Layers


Page View


I then placed Anna's Original FotoBlendz No.5 above the cloud transfers with two photo layers above the FotoBlendz. The first photo at normal mode, the second at darken mode. I used the keyboard shortcut (Mac=Command G) or (Windows=Control G) on both photo layers to clip them to the mask as shown below.

Mask and Photo Layers


Page View

The addition of several layers of WarmGlows No.1 and CoolGlows No.1 at overlay mode (both above and below the photo layers helped create the light and glow in the sky. To complete the page I added the following elements from Anna Aspnes: Oversize Hipster Plumes No.1, Summer Word Transfers No.2, moon and stars from Sun and Moon No.1MagicSprinklez No.2, edge border from ArtPlay Palette No.5 and Stitched by Anna Borders No.2. The font is Brown Cow.

Completed Page


Also consider Anna's Clouds No.1 and Clouds No.2 to achieve the sky effect.

Thursday, June 14, 2012

Scrapbooking with the Color Orange

Tangerine Tango
create a little music with the vibrant, energetic color orange

Tangerine Tango, the PMS color of the year, was the inspiration for a challenge at Get It Scrapped. I created the page above with orange as the dominant color paired with softer harmonious hues and a little split-complimentary for contrast. You can read more about it and see more scrapbook pages incorporating orange in this Get It Scrapped article Scrapbooking with the Color Orange.

This page was created using supplies by: Anna Aspnes Designs: ArtPlay SolidsGather Paperie, ArtPlay SunFun, ArtPlay Palette Autumn Haze, AntiquatedFrames No.2, ArtPlay Palette Jardinier, Original FotoBlendz No.13, ArtPlay Palette Genuine, ArtPlay Palette Concerto Music Notes No.1, DifferentStrokes No.5 BrushSet, ScriptTease Life No.1.  Maya de Groot Midsummer Night’s Dream. (Fonts: P22 Cezanne, soymilk)

Wednesday, June 6, 2012

Summer Page Makeover

As styles evolve, it's a fun challenge to redo a page from a few years ago and compare the changes. This week the challenge at Anna's Gallery was to redo a summer page. I chose a page with bright color and redesigned with a more subtle color palette for a touch of vintage.

the makeover


the original